
Project Planning Pipeline: Plan in Obsidian, Assisted by AI#
I’m currently turning a personal project into something more serious: it started as a CS50 Python assignment and is now something I want to realise as a business. I’m using it to turn LifeClock—my CS50 Python final project—into a product, which I’ve documented in the LifeClock series. That meant I needed a better way to think, ideate, and plan in detail without losing the flexibility of my own notes.
Obsidian is a natural fit for that because everything lives in Markdown, notes are easy to link, and the vault becomes a single source of truth. The Project Planning Pipeline grew out of that need: a small system that helps me plan in Obsidian, keep the structure consistent, and make the notes easy to reuse with AI tools when I want deeper research or a fresh draft.
This article walks through what the Project Planning Pipeline is, what you get after setup, and how to set up your own vault and first project with the CLI.
Why This Structure?#
The pipeline’s stage-based structure follows established product development methodologies. The Stage Gate Process—used by companies like Asana and documented in product management frameworks—divides projects into distinct phases with decision gates: ideation → planning → design → engineering → launch. This approach prevents scope creep and ensures each phase delivers concrete value before moving forward.
The numbered folder structure (00-09) reflects this lifecycle: 00_Status & Roadmap tracks progress, 01_Market Analysis validates opportunity, 02_User Research defines the audience, 03_Product specifies requirements, 04_Design creates experiences, 05_Technical defines architecture, 06_Engineering executes, 07_Analytics & Growth measures success, and 08_Legal & Privacy ensures compliance. You don’t have to use every stage, but the consistent numbering keeps projects navigable as they grow.
The idea is simple: write in one place, keep the structure predictable, and let AI assist when it adds value—without letting it become the source of truth.
What Is the Project Planning Pipeline?#
The pipeline is two things: a standard layout for an Obsidian vault and a Node.js CLI that installs it. The layout gives you one place for project context—a Dashboard, Templates (by stage), and a Projects folder (one folder per project). The CLI installs that layout, plus optional per-project scaffolding, into a folder you choose: run it once for shared assets, then again per project so each project gets the same stage-based structure.
The workflow runs in a loop:
- Plan in Obsidian — Roadmaps, market analysis, PRDs, backlogs
- AI assists — Draft, refine, research, or expand sections
- Single source of truth — Markdown notes feed future implementation work
It doesn’t replace your thinking; it helps you go deeper. You write in the vault, and AI tools can draft, refine, research, or expand sections using the same notes. The pipeline is aimed at digital and software projects, but you can adapt stages and templates to anything you track: research, writing, side projects, or product work.
The vault structure draws on the Obsidian Zettelkasten Starter Kit by Edmund Gröpl, which I’ve used for years as a basis for note structure and dashboards. I highly recommend checking it out; it’s a solid foundation for a Zettelkasten-style workflow in Obsidian.
Requirements: Node.js 20+ (with npm). Obsidian installed.
What You Get After Setup#
After running the CLI you get:
- Dashboard.md — Command center (project list, KPIs, links). The repo ships a starter that uses DataView; you can replace or extend it.
- Templates/ — Per-stage templates (Project MOC, Roadmap, PRD, Backlog, Sprint, Persona, SWOT). These are markdown and canvas templates you instantiate in Obsidian when you add or refine project content.
- Projects/ — One folder per project (initially empty). Each project you add gets its own folder with the same stage folders (see below).
One vault, many projects, one CLI, and one workspace that can see it all.
How to Set Up (Step by Step)#
1. Create or Choose an Obsidian Vault#
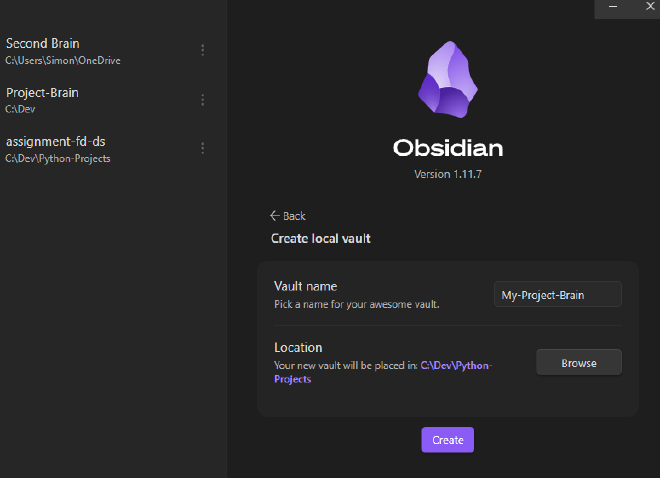
Use a folder that will be your Obsidian vault (e.g. C:\Vaults\MyBrain or ~/vaults/my-brain). If you prefer, create a new vault from Obsidian’s UI: Create local vault, pick a name and a parent folder, then Create. The folder Obsidian creates is the one you’ll pass to the CLI.
2. Install the Pipeline (Shared Assets Only)#
In a terminal, go to that vault folder and run:
cd path/to/your/vault
npx github:Sims2k/Project-Planning-Pipeline setup
If you’re not in the vault directory, pass the path as the first argument:
npx github:Sims2k/Project-Planning-Pipeline setup "C:\Vaults\MyBrain"
npx may ask to install the package once; confirm with y. The CLI then copies into your vault: Projects, Templates, and Dashboard.md. Existing files are left unchanged (merge-only).
3. Create Your First Project#
Run the CLI again with a project name. The name becomes the folder under Projects/:
npx github:Sims2k/Project-Planning-Pipeline setup --project "My First Project"
Or with an explicit vault path:
npx github:Sims2k/Project-Planning-Pipeline setup "C:\Vaults\MyBrain" --project "My First Project"
The CLI creates Projects/My First Project/ and inside it the full stage layout (see next section). You can add more projects anytime by running the same command with a different --project "Another Project" name.
4. Enable Community Plugins in Obsidian (Recommended)#
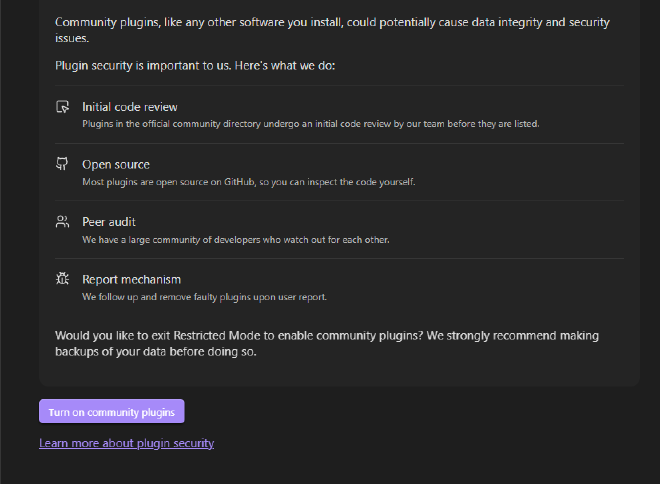
The Dashboard and many templates work best with a few Obsidian community plugins. Open the vault in Obsidian, then go to Settings → Community plugins. If Obsidian shows a security notice about community plugins, you can Turn on community plugins (consider making a backup of your vault first).
In Community plugins, click Browse and install (and enable) these:
- DataView — Used by the default Dashboard for tables and lists from your notes.
- Templates — So you can insert notes from the
Templates/folder (e.g. Project MOC, PRD, Backlog). Point the core Templates plugin or your preferred one at theTemplatesfolder. - Charts — For charts in the Dashboard or project notes.
- Banners — Optional; some templates reference banner images in note headers.

Restart Obsidian if prompted. After that, open Dashboard.md and, if you use the default template, you should see DataView blocks and placeholders you can adapt.
Vault Layout and Stage Folders#
I set up the pipeline around several phases that fit how I move from idea to execution. After setup, each project folder under Projects/ has the same structure:
| Stage | Contents |
|---|---|
| 00_Status & Roadmap | Status dashboard, roadmap, decision log |
| 01_Market Analysis | Market overview, competitor map, SWOT, TAM/SAM/SOM |
| 02_User Research | Personas, interview notes, surveys |
| 03_Product | PRD, value proposition, lean/business model canvas |
| 04_Design | UX flows, wireframes, copy |
| 05_Technical | Tech stack, architecture, deployment |
| 06_Engineering | Backlog, sprints, validation plan (with a Sprints subfolder) |
| 07_Analytics & Growth | KPIs, experiments, channels |
| 08_Legal & Privacy | Privacy/GDPR notes, policy drafts |
| 09_Assets | References, media, documents |
| Archive | Retired or superseded content |
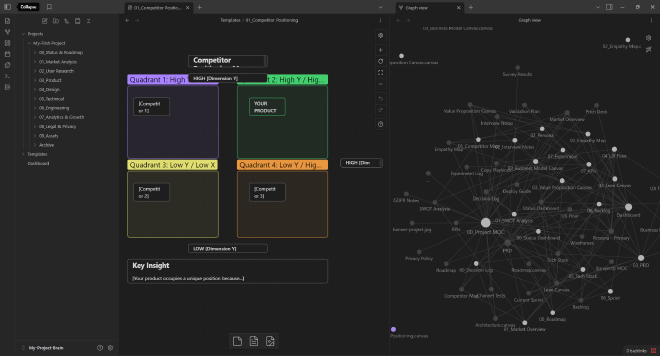
You don’t have to use every stage; the numbering keeps a consistent order. In Obsidian, you can create a Project MOC (Map of Content) from Templates → 00_Project MOC.md in each project folder and link it from the Dashboard so everything stays discoverable.
Using AI with the Vault#
Open the vault folder as your workspace in the editor or assistant of your choice. One thing is important: this pipeline does not write code. Everything stays in Markdown—notes, roadmaps, PRDs, research. Those Markdown notes are the source of truth; later, when you switch to implementation, you can point your IDE or coding agents at this vault so they have full project context.
The assistant-facing config files contain rules, skills, and agents that make that workflow consistent.
Rules#
Rules are passive, persistent instructions that shape agent behavior based on glob patterns or always-apply settings. The pipeline ships a small set of rules for keeping the workspace structured and predictable.
They cover things like:
- folder hierarchy
- note conventions
- template usage
- canvas file handling
- git workflow
- syncing project context
Skills#
Skills are invocable capabilities—the agent can use them when relevant or you can invoke them directly. The pipeline ships skills for:
- editing Obsidian Flavored Markdown
- handling Obsidian canvas files
- keeping workflows consistent across projects
- structured project documentation
Agents#
Agents are sub-agents (custom roles) that you can invoke when you need role-specific help. The pipeline ships a range of agents for planning, research, product thinking, design, engineering, QA, and documentation.
You can ask for help like “draft a persona from these bullets” or “outline the next product milestone,” and get output that fits the vault and the stage folders. The point is to keep planning, thinking, and writing inside Obsidian while AI helps you fill in gaps without becoming the source of truth.
CLI Reference#
| Command | Description |
|---|---|
pipeline setup | Install into current directory (shared assets only). |
pipeline setup --project "Project Name" | Create Projects/Project Name/ with all stage folders. |
pipeline setup [vault-path] | Use vault-path as the vault (e.g. C:\Vaults\MyBrain). |
pipeline setup [vault-path] --project "Project Name" | Vault path and project name together. |
pipeline version | Print version. |
pipeline --help | Show all options. |
Options: -p, --project <name> (project folder name); -f, --overwrite (overwrite existing files); --no-color. Exit codes: 0 success, 1 error, 2 invalid path.
Global install: npm install -g github:Sims2k/Project-Planning-Pipeline — then you can run pipeline setup and pipeline setup --project "Name" from anywhere; pass the vault path when you’re not inside the vault folder.
Setup Without the CLI#
If you don’t have Node.js, you can clone the repo and copy assets by hand. See the CLI Reference section above for the standard setup flow.
What to copy:
- Shared:
Dashboard.md→ vault root;Templates/*→Templates/; create an emptyProjects/folder. - Per project: Create
Projects/YourProjectName/and copy the contents ofpipeline-assets/project-folders/into it (all stage folders and06_Engineering/Sprints).
Don’t overwrite existing files unless you intend to. The repo’s README has the exact layout.
Related: LifeClock (Part 1/2): From Memento Mori to Python and LifeClock (Part 2/2): Refactoring to Clean Architecture—the pipeline was built to support turning that project into a product.
Resources#
- Obsidian Zettelkasten Starter Kit — Foundation for Zettelkasten-style workflows in Obsidian
- Obsidian-Templates — Template collection by Edmund Gröpl
- Stage Gate Process (Asana) — Product development stage methodology
- Claude Code Skills — SKILL.md format (compatible concept)
This article is part of my Digital Odyssey series: documenting tools and workflows that connect planning, knowledge management, and coding. The Project Planning Pipeline is open source and maintained on GitHub.